







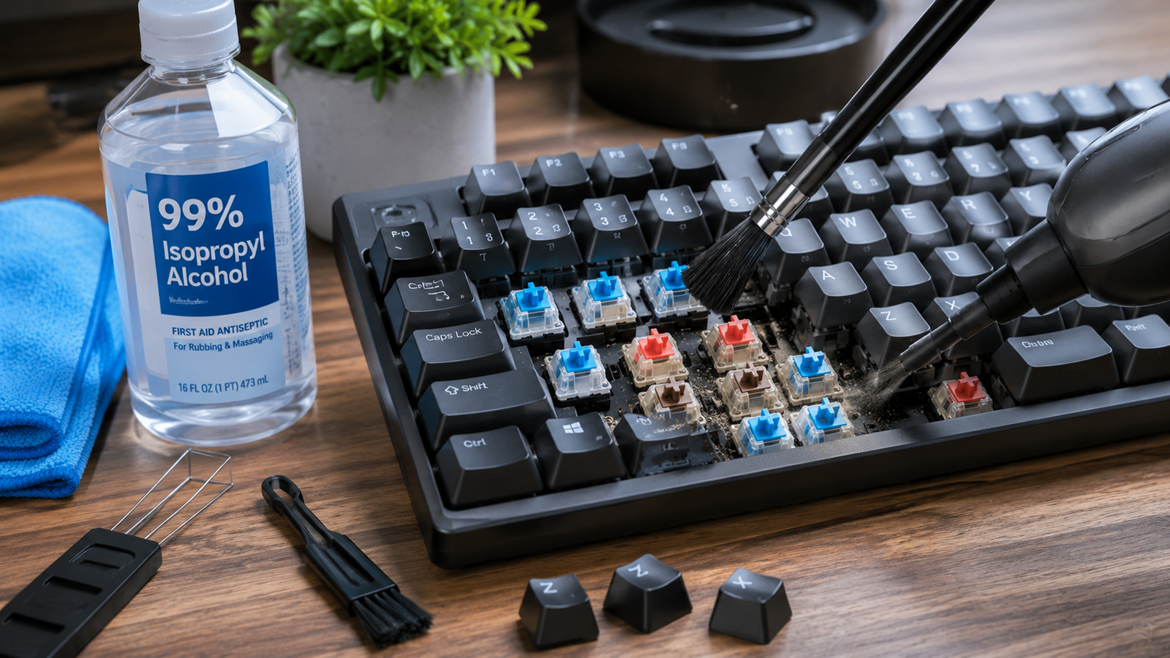
Learn how to clean mechanical keyboard switches without desoldering using safe, effective methods. Remove dust, sticky keys, and improve keyboard performance with this complete step-by-step guide.
Introduction
A mechanical keyboard is one of the best investments you can make if you spend hours typing, gaming, programming, or creating content. Unlike traditional membrane keyboards, mechanical keyboards use individual switches beneath each keycap, providing superior durability, tactile feedback, and customization. Unfortunately, these switches are also magnets for dust, pet hair, crumbs, skin oils, and spilled drinks. Over time, contaminants accumulate inside and around the switches, causing sticky keys, scratchy movement, inconsistent keystrokes, or even complete key failure.
Many people assume that fixing dirty switches requires desoldering every switch from the printed circuit board (PCB). While that approach allows deep cleaning, it also requires soldering equipment, technical knowledge, and several hours of work. The good news is that in many situations, you can restore switch performance without desoldering. Whether your keyboard is hot-swappable or permanently soldered, several safe cleaning techniques can remove dirt and improve switch feel while keeping your keyboard fully assembled.
This guide explains exactly how to clean mechanical keyboard switches without desoldering. You’ll learn which tools work best, which cleaning products are safe, and which common mistakes could permanently damage your keyboard. By the end of this article, you’ll have a practical maintenance routine that extends the lifespan of your keyboard and keeps every keystroke feeling crisp and responsive.
Understanding Mechanical Keyboard Switches
Mechanical switches may look simple from the outside, but each one contains several precision-engineered components working together. A typical switch includes a top housing, bottom housing, spring, stem, and metal leaf contacts. Every time you press a key, the stem compresses the spring until the metal contacts touch, sending an electrical signal to your computer. This precise movement is what creates the satisfying tactile feel mechanical keyboard enthusiasts love.
Because the moving parts operate with tight tolerances, even tiny particles can interfere with smooth movement. Dust acts like fine sandpaper, increasing friction between the stem and housing. Food crumbs can block the stem from returning completely after a keypress. Sticky drink residue causes switches to bind or move sluggishly, while pet hair can wrap around stems and springs, producing unusual resistance. Environmental humidity can also combine with accumulated oils to create stubborn grime that regular surface wiping cannot remove.
Another factor many users overlook is daily skin oil. Every keypress transfers microscopic amounts of natural oils from your fingertips to the keycaps and eventually into the switches. These oils attract additional dust, accelerating dirt buildup over months of regular use. Gamers who frequently use WASD keys often notice those switches becoming scratchier long before the rest of the keyboard because they receive far more use.
Recognizing how switches become dirty helps determine the right cleaning method. Light dust usually requires nothing more than compressed air and a soft brush, while sticky residue often demands isopropyl alcohol and repeated cleaning. Understanding the source of the problem allows you to clean effectively without risking damage to delicate switch components.
Can You Clean Mechanical Keyboard Switches Without Desoldering?

The short answer is yes, but the results depend on the type of contamination and your keyboard’s construction. Surface dirt, dust, lint, hair, and light sticky residue can usually be removed successfully without taking the keyboard apart. Even many sluggish switches recover completely after careful cleaning with compressed air and high-purity isopropyl alcohol. These methods are particularly effective when maintenance is performed regularly instead of waiting until severe problems develop.
Hot-swappable keyboards make cleaning easier because the entire switch can be removed using a switch puller without touching a soldering iron. Once removed, each switch can be cleaned more thoroughly before being reinstalled. Soldered keyboards, however, require cleaning while the switches remain attached to the PCB. Although this limits access to internal components, it is still possible to flush debris from the switch opening using safe cleaning techniques.
It’s equally important to understand the limitations of cleaning. If a switch has worn-out metal contacts, a broken spring, cracked housing, bent pins, or severe liquid corrosion, cleaning alone won’t solve the problem. In those cases, replacing the switch becomes the only reliable solution. Likewise, if sugary liquids dried inside the switch months ago, multiple cleaning attempts may be necessary before normal performance returns.
The key is setting realistic expectations. Cleaning without desoldering is an excellent maintenance technique that solves the majority of everyday keyboard issues. It restores smooth movement, reduces friction, improves consistency, and extends switch lifespan without requiring advanced repair skills. For most users, this approach offers the perfect balance between effectiveness, safety, and convenience.
Tools You’ll Need
Cleaning mechanical keyboard switches without desoldering is much easier when you have the right supplies. The good news is that you don’t need expensive equipment or professional repair tools. Most of the items are affordable, easy to find, and reusable for future keyboard maintenance. Investing in proper cleaning tools also reduces the risk of damaging delicate switch components compared to using household substitutes.
The first essential tool is a keycap puller. A wire-style keycap puller is generally preferred over a plastic ring puller because it grips keycaps more evenly and minimizes the chance of scratching the sides. Removing the keycaps exposes the switches, allowing you to clean areas that are normally hidden. Pair this with a soft anti-static brush, which helps loosen dust, lint, and hair without generating static electricity that could potentially harm sensitive electronics.
Another must-have is compressed air. Short bursts of compressed air effectively remove loose debris trapped around and inside the switches. Hold the can upright while spraying to prevent liquid propellant from escaping. For sticky switches, use 99% isopropyl alcohol, which evaporates quickly and leaves minimal residue. A few drops applied with a precision applicator or cotton swab can dissolve grime without soaking the switch. If you’re working on a hot-swappable keyboard, a switch puller is also useful for removing switches safely. Keep a microfiber cloth nearby for wiping surfaces, and consider using tweezers to remove stubborn hairs or crumbs lodged between switches.
Supplies to Avoid
Using the wrong cleaning products can do more harm than good. Water, household cleaners, bleach, ammonia-based sprays, and scented cleaning solutions may leave conductive residue, promote corrosion, or damage plastics over time. Avoid spraying WD-40 or silicone lubricants into switches unless they are specifically designed for keyboard switches. These products attract dust and may interfere with the switch’s electrical contacts. Paper towels can also leave fibers behind, so lint-free microfiber cloths are a better choice.
The table below summarizes recommended and non-recommended supplies:
| Safe to Use | Avoid Using |
| Wire keycap puller | Metal screwdrivers for prying keycaps |
| Soft anti-static brush | Hard-bristle brushes |
| 99% isopropyl alcohol | Water and household cleaners |
| Compressed air | Air compressors with moisture |
| Microfiber cloth | Paper towels that shed fibers |
| Tweezers | Sharp metal tools inside switches |
Choosing the correct tools from the beginning makes the cleaning process smoother, safer, and much more effective. It also minimizes the chances of accidentally damaging your keyboard while trying to fix a minor issue.
Step-by-Step Cleaning Process
Cleaning your mechanical keyboard without desoldering is a straightforward process when done patiently. Rushing can lead to broken keycaps, bent stabilizers, or excessive liquid entering the switches. Set aside enough time to clean the keyboard properly and allow it to dry before reconnecting it to your computer.
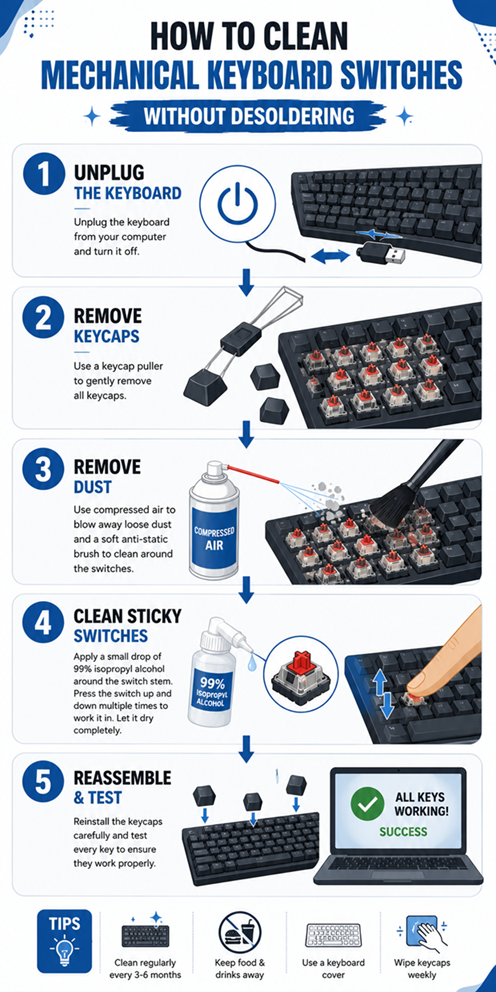
Step 1 – Disconnect and Prepare
Begin by unplugging the keyboard from your computer. If you’re using a wireless keyboard, switch it off and remove the batteries if possible. Place the keyboard on a clean, well-lit workspace where small parts won’t get lost. Taking a quick photo of the keyboard layout before removing the keycaps can save time during reassembly, especially for keyboards with non-standard layouts.
Next, gently tilt the keyboard upside down and tap it lightly. You may be surprised by how many crumbs, hairs, and dust particles fall out before you even begin cleaning. This simple step removes loose debris and makes the remaining cleaning much easier.
Step 2 – Remove the Keycaps
Using the wire keycap puller, carefully remove each keycap by pulling straight upward. Avoid twisting aggressively, as this can stress the stems or stabilizers on larger keys such as the Spacebar, Enter, Shift, and Backspace. Place the removed keycaps in a container or tray to keep them organized.
Once the keycaps are removed, you’ll likely notice dust rings, hair, and debris surrounding the switches. This is completely normal and is one of the main reasons keyboards gradually lose their smooth feel over time.
Step 3 – Remove Dust and Debris
Use compressed air to blow dust away from each switch. Hold the nozzle several inches from the keyboard and spray in short bursts rather than one continuous blast. Rotate the keyboard slightly while cleaning so debris falls away instead of being pushed deeper into the switch.
After using compressed air, gently brush around each switch with the anti-static brush. Work in small sections and use light strokes to loosen particles trapped between switches. If pet hair or larger debris remains, carefully remove it using tweezers instead of forcing it into the switch housing.
Step 4 – Clean Sticky Switches
If a switch feels sticky or sluggish, lightly dampen a precision swab with 99% isopropyl alcohol. Do not soak the switch. Instead, apply a tiny amount around the stem opening while repeatedly pressing the switch. The movement helps distribute the alcohol inside the switch, dissolving oils and sticky residue.
Continue pressing the switch 20–30 times to work the alcohol through the moving components. Allow the switch to air dry completely before testing it. Since high-purity isopropyl alcohol evaporates quickly, drying usually takes only a few minutes, but waiting longer provides additional peace of mind.
Step 5 – Dry, Reassemble, and Test
After cleaning, inspect the keyboard to ensure no visible moisture remains. Replace each keycap by pressing it straight onto the switch stem until it clicks securely into place. Reconnect the keyboard and test every key using a keyboard testing utility or a simple text editor.
If one or two keys still feel inconsistent, repeat the cleaning process rather than adding more liquid. Stubborn residue sometimes requires multiple gentle cleanings before the switch returns to normal. Patience usually delivers better results than aggressive cleaning methods.
Preventing Future Dirt Build-Up
Cleaning your mechanical keyboard is satisfying, but preventing dirt from accumulating in the first place saves time and helps preserve the feel of your switches for years. Mechanical switches are designed to withstand tens of millions of keystrokes, yet their lifespan can be shortened when dust, food particles, and moisture repeatedly enter the switch housing. A few simple habits can significantly reduce the amount of maintenance your keyboard requires while keeping every keypress smooth and consistent.
One of the most effective preventive measures is keeping food and drinks away from your keyboard. Even tiny crumbs can work their way into switches, and sugary beverages are particularly troublesome because they leave behind sticky residue that attracts more dust over time. If you enjoy snacks while working or gaming, consider taking short breaks rather than eating directly over the keyboard. Likewise, washing and drying your hands before long typing sessions reduces the transfer of oils and dirt from your fingertips to the keycaps.
Using a keyboard dust cover when the keyboard is not in use is another inexpensive yet highly effective solution. Dust settles surprisingly quickly, especially in homes with pets or in environments where windows are frequently open. Covering the keyboard overnight or during extended periods of inactivity minimizes airborne particles from entering the switches. Regularly wiping the keycaps with a microfiber cloth also prevents oils from accumulating and migrating into the switch openings.
Your workspace also plays a role in keyboard cleanliness. Vacuuming or dusting your desk regularly reduces airborne debris, while maintaining moderate humidity levels can prevent dust from clinging to surfaces due to static electricity. Small habits, when practiced consistently, often eliminate the need for deep cleaning sessions.
Maintenance Tips
Routine maintenance is much easier than restoring a heavily neglected keyboard. Consider following these best practices:
- Wipe the keycaps weekly with a clean microfiber cloth.
- Blow compressed air across the keyboard every two to four weeks.
- Remove keycaps for a more thorough cleaning every three to six months.
- Address spills immediately by disconnecting the keyboard and cleaning affected switches before residue dries.
- Store the keyboard in a clean, dust-free area when not in use for extended periods.
By following these habits, you’ll spend less time fixing sticky keys and more time enjoying a keyboard that feels as satisfying as the day you bought it.
Recommended Cleaning Schedule
A consistent maintenance schedule helps extend the lifespan of both the switches and the keyboard itself. The ideal frequency depends on how heavily the keyboard is used and the environment it’s in.
| Task | Recommended Frequency |
| Wipe keycaps | Weekly |
| Blow out dust with compressed air | Every 2–4 weeks |
| Remove keycaps for detailed cleaning | Every 3–6 months |
| Clean sticky switches | As needed |
| Full keyboard inspection | Every 6–12 months |
Heavy gamers, programmers, writers, and office workers who spend many hours each day at the keyboard may benefit from more frequent maintenance than occasional users.
Common Mistakes to Avoid
Even with good intentions, it’s easy to make mistakes that can damage a mechanical keyboard. One of the most common errors is using too much liquid during cleaning. While 99% isopropyl alcohol is generally safe, flooding a switch can wash contaminants deeper into the mechanism or temporarily interfere with electrical contacts until the alcohol has fully evaporated. Applying only a small amount is usually more effective than soaking the switch.
Another frequent mistake is using excessive force when removing keycaps. Pulling at an angle or twisting aggressively can crack keycaps, damage switch stems, or bend stabilizer wires on larger keys. A wire keycap puller and gentle upward pressure are all that’s needed for most keyboards.
Many users also overlook the importance of disconnecting the keyboard before cleaning. Even though the risk is relatively low when using high-purity alcohol, cleaning a powered keyboard increases the chance of accidental key presses or short circuits. Always unplug wired keyboards or power off wireless models before beginning any maintenance.
Some people attempt to lubricate noisy or scratchy switches by spraying general-purpose lubricants into the switch openings. This often creates a sticky mess that attracts more dust and can negatively affect switch performance. Proper switch lubrication requires specialized products and, in most cases, disassembling the switch. If your goal is simply to remove dirt, cleaning is the better approach.
Finally, patience is essential. Reconnecting the keyboard before all cleaning solution has evaporated can cause temporary issues that may be mistaken for hardware failure. Allow sufficient drying time before testing your work.
Conclusion
Mechanical keyboards are built to last, but even the highest-quality switches require occasional maintenance to deliver their best performance. Dust, lint, hair, and everyday oils gradually accumulate inside the switch housing, leading to scratchy movement, sticky keys, and inconsistent typing. Fortunately, most of these problems can be resolved without desoldering the switches or investing in specialized repair equipment.
By using the proper tools—such as a wire keycap puller, compressed air, an anti-static brush, and 99% isopropyl alcohol—you can safely clean your keyboard while preserving the integrity of its switches. Regular preventive maintenance is equally important. Simple habits like keeping food away from your workspace, covering the keyboard when it’s not in use, and performing light cleaning every few weeks can dramatically reduce long-term wear and contamination.
A clean mechanical keyboard doesn’t just look better—it feels better, sounds better, and performs more reliably. Whether you’re gaming competitively, writing reports, coding software, or simply browsing the web, investing a little time in routine maintenance helps ensure that every keystroke remains smooth, responsive, and enjoyable for years to come.
Frequently Asked Questions
1. Can I use 70% isopropyl alcohol instead of 99%?
Yes, but 99% isopropyl alcohol is preferred because it evaporates faster and contains less water, reducing the risk of moisture lingering inside the switches.
2. How often should I clean my mechanical keyboard?
Light cleaning every two to four weeks and a more thorough cleaning every three to six months is sufficient for most users. Heavy daily use may require more frequent maintenance.
3. Will cleaning fix a double-typing key?
Sometimes. If dust or debris is causing poor contact, cleaning may solve the issue. If the switch is worn out or electrically damaged, replacement is usually necessary.
4. Is compressed air safe for keyboard switches?
Yes. Use short bursts while holding the can upright to avoid releasing liquid propellant. This safely removes loose dust and debris from around the switches.
5. When should I replace a switch instead of cleaning it?
If a switch continues to malfunction after repeated cleaning, or if it has physical damage, corrosion, or worn internal contacts, replacing the switch is the most reliable solution.


